Latest Post

 how to make beautiful wall clock using household item

In this project we learn how to make beautiful wall clock using household item. its very easy simple and money saving project. for making this project we need some components. 

Components:

how to make beautiful wall clock using household item
  • Wall clock machine.
  • Wall clock cell
  • Card board.(i use old cake base)
  • Print of numbers.
now following few steps and make same.
  • 1st color print of numbers on sticker paper.
  • Now adjust this paper on cardboard of cake base. 
  • And now attach clock machine on this cardboard. 
  • Now attach time needle.
  • And finally connect cell with clock machine.
we learn it more batter with watching video.

Video of homemade beautiful wall clock


Total cost of wall clock project:

Total cost of this project roundabout 1$
  • wallclock machine price is 0.8$ in local market.
  • print paper cost rountabut 0.1$ in local market
  • cell cost roundabout 0.1$
  • and cardboard is free.

 How to make 220v universal led tester

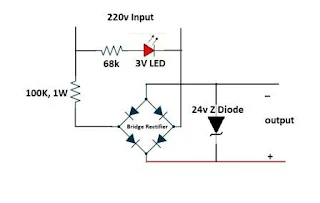
In this project we learn how to make 220v universal led tester easy at home. its very easy and simple project. you can test all type of leds. for making this project we need some components.

Components:

How to make 220v universal led tester
  1. Bridge rectifier
  2. 3 volt LED
  3. 68k resistor
  4. 24v zener diode
  5. 100k, 1 watt resistor
  6.  Shoe switch
  7.  Old tester wire
Now follwing few steps and make same.
  • Connect 1 side of 68k resistor with 3v LED 
  • 2nd side of 68k resistoe and LED use for 220v input.
  • Now 100k 1w resistor connect with 2nd side of 68k resistor.
  • And now connect bridge rectifire. (you can make bridge rectifier using 4 diodes of 1N4007.
  • Finaly connect 24v zener diode. 
we learn it more batter with watching video

Video of homemade 220v universal led tester


Total Cost of 220v universal led tester:

the total cost of this project round about 0.3$
  • shou switch cost roundabout 0.2$ 
  • zener diode cost roundabout 0.01$
  • bridge rectifire cost roundabout 0.04$
  • led cost roundabout 0.01$
  • 68k resistor cost roundabout 0.01$
  • 100k 1w resistor cost roundabout 0.03$


 How to rewind armature of drill machine

In this project we learn how to rewind armatore of drill machine. its very easy and simple process. 
1st we need some basic information about armature of drill machine.
Its duplex winding. 
How to rewind armature of drill machine

Pole is 2 north and south.
Segment is 24 
And slot is 12. 
We know pitch is equal to slot over pole.
12/2 =  Answer is 6
Mean we wind in 1 and 6 slot reshow 
For more simplify we make a simple chart of slot and segment combination.
Slot Segment
1-6 1,2
2-7 3,4
3-8 5,6
4-9 7,8
5-10 9,10
6-11 11,12
7-12 13,14
8-1 14,16
9-2 17,18
10-3 19,20
11-4 21,22
12-5 23,24


Now we wind very easily with the help of this chart. simple put a number on armature slot and segment. and start winding with the help of this chart.

Video of rewind armature of drill machine.


What is duplex winding?

if segment is 24 and slot is 12 so its duplex winding.
if segment and slot both are equal then its called simplex winding.
if segment is 36 and slot is 12 then its called triplex winding.

 How to make bearing puller within 2 mints

In this project we learn how to make bearing puller within 2 mints. its very usefull tool. you can open your drill machine bearing very easily. 


How to make bearing puller within 2 mints
For making this project we need some components.
  • 3 Screws 
  • Iron or any hard metel piece. 
I use a small piece of aluminum sheet. 1st do 3 holes in this sheet. now 2 screw connect in 1st hole and 3rd hole of sheet. and 3rd screw connects the middle hole but in the opposite direction.
your job done. 
we learn it more better with watching this video.

video for making homemade bearing puller


Total cost of this project:

its total free for me. but rufly if we calcuate then 3 screw cost rounabout 0.3$

 How to make 5v to 1.5v converter circuit

How to make 5v to 1.5v converter circuit
In this project we learn How to make 5v to 1.5v converter circuit easy at home. you can run your wall clock, your calculator and all 1.5v products using this circuit. we make this circuit only 3 componets with the help of circuit diagram. you can also convert your 3.7v mobile and litheam battery with this curcuit. 
for making this project we need some components
  • LM317 Voltage regulator
  • 470ohm resistor
  • 100 ohm resistor
  • soldering wire
    5v to 1.5v converter circuit diagram

  • soldering iron
Now following this steps and make same
  • LM317 has 3 pin, connect 470 ohm resistor between 1st and 2nd pin of regulator. 
  • Now one side of 100 ohm resistor connect with1st pin of regulator.
  • 2nd side of resistor use for negative input and negative output. 
  • 3rd pin of regulator use for positive input.
  • And 2nd pin of regulator use for positive output.

Video for 5v to 1.5v converter circuit


Total cost of this project:

Total cost of this 1.5v converter circuit is round about 0.105$
  • lm317 voltageregulator price is 0.1$ in local market.
  • And 2 resistor price is 0.005$ in local market.

 Life hack with sogo fan - how to reuse old fan

in this video we learn how to reuse or repair old stuck sogo dc fan. some time our fan power supply dead and new power supply is very costly so we can use this method and enjoy cool air with your fan.

for making this project we need some components.

Life hack with sogo fan - how to reuse old fan

  • 6v, 2amp charger (if your fan 12v then use 12v 2amp charger)
  • Charging connenctor
now simple following few steps.
  • 1st open sogo fan.
  • now find fan dc motor wire connection.
  • take charger connector and connect both dc motor wires with this connector.( positive and negative connection in mind)
  • now close fan.
  • and lastly connect 6v charger with connector and use it. you job done.
watch video for more batter understand.

video for how to reuse old sogo charging fan


Life hacks with temperature sensor

In this project we learn how to convert simple digital infrared thermometer into rechargeable. its very easy, simple and money saving project. if you use this method then you can save cell charges.
For making this project we need some components.
  • Mobile battery
  • 5v charging module (TP4056)
  • On/off switch
Now followning few steps and make same.
  • 1st open infrared thermometer
  • 2nd take 3.7v battery and connect charging module same like diagram
  • 3rd connect switch between battery positive side.
  • now adjust it in thermometer casing.

video for convert rechargeable infrared thermometer:


How to repair dead bike battery within 2 mints

In this project we learn how to repair dead bike battery with in 2 mints. its very easy and usefull method. For making this project we need some compeonts.
How to repair dead bike battery within 2 mints

  • Battery acid
  • Battery water or distal water
Now you can easily repair all types of batteryies using simple follow fewing steps.
  • 1st remove all battery caps
  • 2nd half fill battery with battery acid
  • And remaning half fill with distisal watter
  • Now take a 5 amp charger and charge it for 2 hours.
  • Now close all battery holes with caps.
your battery is ready for use.

video for repairing dead bike battery:


How to make bike battery charger with in 2 mints

In this porject we learn how to make bike battery charger with in 2 mints. Its very usefull project. Sometime we go for vications and bikes and car are lock for few days. And when we try to on bike that time we need to recharge battery.  That time we really need this charger. 
How to make bike battery charger with in 2 mints
for making this project we need some components. 
  • 12V, 5 Amp Transformer
  • 6A10 Diode
  • 50v, 4700uf Capacitor
  • PCB Board
  • Soldering wire
  • Soldering iron
Now folowing few simple steps and make same.
  • Transformer has 2 side, input side and output side,
  • circuit diagram of bike battery charger
    Input side use for 220 volt power supply, Output side use for 12 volt output.
  • Now take 4 diode and make a bridge rectifier.
  • Take 50v 4700uf capacitor and connect on output DC side of bridge. (Capacitor use for smooth DC power)
  • Now connect transformer with diode bridge.
  • And finally connect 2 wires with capacitor for outputs. 

Video for making bike battery charger:


Total cost of bike battery charger project:

the total cost of bike battery charger project is round about 8.5$
transformer price is 7$, 4 diodes of 6A10 diode price round about 0.8$, 50v capacitor price is round about 0.3$ in local market.

Easy Creative Projects

{facebook#https://web.facebook.com/easycreativeprojects/} {twitter#https://twitter.com/easycreativepro} {youtube#https://www.youtube.com/c/easycreativeprojects}

Contact Form

Name

Email *

Message *

Powered by Blogger.
Javascript DisablePlease Enable Javascript To See All Widget