Articles by "led-projects"

 How to make 220v universal led tester

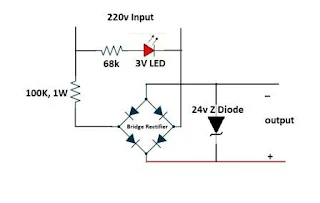
In this project we learn how to make 220v universal led tester easy at home. its very easy and simple project. you can test all type of leds. for making this project we need some components.

Components:

How to make 220v universal led tester
  1. Bridge rectifier
  2. 3 volt LED
  3. 68k resistor
  4. 24v zener diode
  5. 100k, 1 watt resistor
  6.  Shoe switch
  7.  Old tester wire
Now follwing few steps and make same.
  • Connect 1 side of 68k resistor with 3v LED 
  • 2nd side of 68k resistoe and LED use for 220v input.
  • Now 100k 1w resistor connect with 2nd side of 68k resistor.
  • And now connect bridge rectifire. (you can make bridge rectifier using 4 diodes of 1N4007.
  • Finaly connect 24v zener diode. 
we learn it more batter with watching video

Video of homemade 220v universal led tester


Total Cost of 220v universal led tester:

the total cost of this project round about 0.3$
  • shou switch cost roundabout 0.2$ 
  • zener diode cost roundabout 0.01$
  • bridge rectifire cost roundabout 0.04$
  • led cost roundabout 0.01$
  • 68k resistor cost roundabout 0.01$
  • 100k 1w resistor cost roundabout 0.03$


 How to make 12v led bulb

in this project we learn how to make 12v led bulb easy at home that directly work on 12v battery or power supply. for making this project we need some components.
how to make 12v led bulb

  • old led bulb
  • 12v led strip (that directly work on 12v)
  • soldering wire
  • soldering iron
now follow simple steps and make same.
  • 1st open old led bulb and remove old circuit and strip.
  • now direct connect new 12v strip. and close led bulb 

video of how to convert old 220v led bulb into 12v led bulb


How to run RGB multicolor flash led on 220v

In this project we learn how to run RGB multicolor flash led on 220v easy at home with the help of video and circuit diagram. its very simple and interesting project. for making this project we need some components.

Components:
How to run RGB multicolor flash led on 220v
  • RGB Multicolor L E D
  • 47uf, 16 volt capacitor
  • 1N4007 Diode
  • 100 k Resistor
  • Soldering wire
  • Soldering iron
Now following few simple steps and make same.
  • Connect 100k Resistor with one side of 220 volt power supply,
    circuit diagram of how to run multicolor led on 220v
    circuit diagram of how to run multicolor led on 220v
  • And diode cathode side connect with 2nd side of 220 volt power supply like diagram.
  • Now positive side of 47uf capacitor connect with 2nd of resistor
  • And negative side connect with diode anode pin, like diagram,
  • Finally positive side of RGB led connect with positive side of capacitor
  • And negative side connect with negative side of capacitor.
We learn it more batter with watching video.

Video of how to run RBG Multicolor LED on 220v:


How to make 220v LED bulb easy at home

In this project we learn how to make 220v LED bulb easy at home with the help of LED Chip. its very easy homemade and very useful project total cost of this project is only 0.3$.
for making this project we need some components.

Components:

  • LED Chip 220v 12w
  • Old energy saver cover
  • Aluminium Piece
  • Plastic Bottle
  • Soldering Wire
  • Soldering Iron
circuit diagram of 220v led chip
220v led chip is directly connect with live wire. you can connect any wire with LED Chip. (Positive Negative No issue)


aluminium pieces

take any aluminium piece and cut it for LED Chip in round shape. aluminium chip is use for heat sink.


plastic bottle cutting

Now take plastic bottle and cut it in round shape. plastic bottle is use for light filter. id we dont use plastic bottle then led light directly effect our eyes. and very painful for us. you can use and white plastic sheet.


Add caption
Now assembling all parts in old energy saver like diagram.
1st adjust aluminium piece in energy saver body. 
2nd adjust 2nd aluminium piece in upper side. 
3rd adjust led chip on aluminium. 
Aluminium is best for heat sink. its increase our LED Chip life.


we learn it more battery with watching video.

video of how to make 220v LED Bulb:


Some basic Question and Answers:

How many total cost of making 220v led bulb?

220v 12w LED Chip piece is 0.3$ in market. other all components we can easily find from home. (like old energy saver, and aluminium piece) for aluminium we can also use old tv antenna wings. they are also make in aluminium.
so total cost of this project is only 0.3$.
its price in market are 1.8$. but here we make it only 0.3$.

How many life of this 220v led bulb?

its total depend on LED Chip and heat sink. if you use good quality chip and proper use heat sink with heat sink past so its life 2 year to 3 year. so normally we see in markets all led bulb makings companies are provide us 1 year warranty.  

How to run 12v 5w led on 220v

in this project we learn how to run 12v 5w led bulb on 220v easy at home using few simple steps with circuit diagram. its very cheapest, easy and homemade electronic project. for making this project we need some components.

How to run 12v 5w led on 220v
Components:
  • 12 volt 5 watt led bulb (1)
  • 400V 1uf Polyester Capacitor (1)
  • 1M 1 watt Resistor (1)
  • 47 ohm 1 watt resistor (1)
  • 25v 100uf capacitor (1)
  • 1N4007 Diode (5)
  • PCB Board
  • Soldering wire
  • Soldering iron
  • old energy saver
  • hot glue gun
In this project we use 400 volt and 1uf polyester capacitor. in market its also know as 105J number capacitor. 

Circuit Diagram of how to run 12v 5w led on 220v:

circuit diagram of run 12v 5w led on 220v


  • Connect 400v,1uf capacitor with 1M resistor.
  • one side of 400v capacitor connect with 220v live wire.
  • Take a 4 diode of 1N4007 and make a diode bridge like diagram.
  • diode bridge provide us 4 connection. 2 input connection and 2 output connection.
  • one input connection connect with 400v capacitor. 
  • and 2nd input connection connect with 220v live wire.
  • now connect 25v, 100uf capacitor with output pins of diode bridge.
  • now connect one side of 47 ohm resistor with positive side of capacitor.
  • and 2nd side of resistor connect with positive side of 12v led.
  • and finally 2nd side of led connect with negative side of capacitor.

adjust led on energy saver


  • Now connect all component on PCB Board using circuit diagram.
  • now take old energy saver and adjust this pcb circuit on energy saver using hot glue gun.


its very easy and simple circuit. all components you can get from electronic shop very easily. we learn it more batter with watching video.

Video of run 5 watt led on 220v :


in conclusion its simple low cost homemade energy saving project. you can use this LED Bulb on house store, house terrace, or any low light place. its easy long life and durable project. you can direct run it on 220v power supply. you can also run it with UPS.

Easy Creative Projects

{facebook#https://web.facebook.com/easycreativeprojects/} {twitter#https://twitter.com/easycreativepro} {youtube#https://www.youtube.com/c/easycreativeprojects}

Contact Form

Name

Email *

Message *

Powered by Blogger.
Javascript DisablePlease Enable Javascript To See All Widget