

How to make touch switch using pnp transistor
In this video we learn How to make touch switch using pnp transistor easy step by step with circuit diagram.
 |
| How to make touch switch using pnp transistor |
for making this project we need some components.
Components:
- BC557 PNP Transistor (1)
- 220 ohm Resistor (1)
- LED (1)
- 9V Battery
- Battery clip
- PCB Board
- Soldering wire
- Soldering iron
Circuit Diagram:
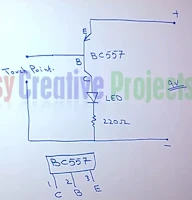

In this project we use bc557 PNP transistor and make a simple circuit. you can use any PNP Transistor and simple replace with bc557.
BC557 PNP transistor has 3 pin. If we see it from front side so 1st pin is collector 2nd base and 3rd is emitter. Positive side of LED connect with collector pin and negative side of LED connect with resistor. 2nd side of resistor and base pin use for touch points. emitter pin use for positive power and 2nd side of resistor also use for negative power. its very easy homemade project using few steps we learn it more better using video.
Post a Comment
Note: Only a member of this blog may post a comment.